
Manual Plans allows the agent to build their own plans for available carriers and products. The agent can type in their own customized plan details and rates. These plans can be exported onto the quote side-by-side to plans listed on the Plan Information screen. It can also be used for enrollment, and managed for benefit administration.
- Agents can create more than 1 manual plan.
- Once built, Manual Plans can be re-used for other future cases.
- When a Manual Plan is assigned to a quote, it can no longer be edited. However, the agent can quickly clone that manual plan, make changes, and use the updated cloned plan for a new quote.
Create, Edit, Delete, or Clone a Manual Plan
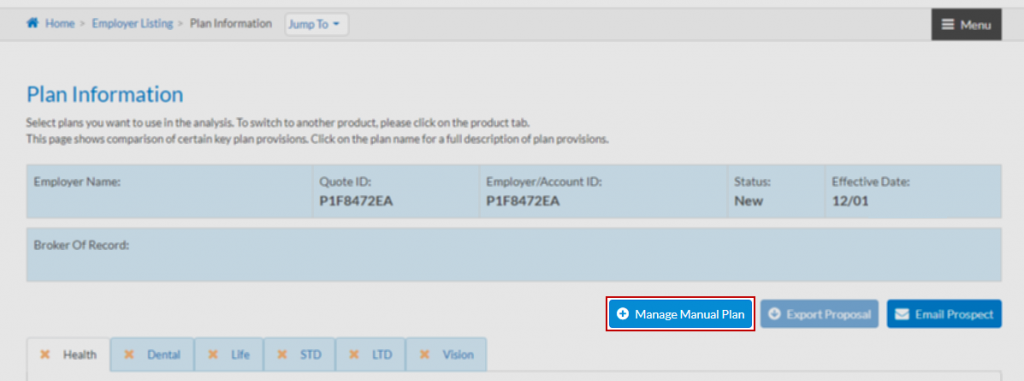
After adding a new employer and entering the census, you will find the Manual Plan button on the next screen in the process: Plan Information. If you do not see the Manage Manual Plan button, our service team will have to enable it for you (855) 294-3258
- Click Manage Manual Plan
- Select a coverage from the drop-down and click Submit
- You will now see a list below of manual plans created for this employer and the coverage selected.
- Create plans by clicking the Add Plan button.
- Delete plans by selecting plan(s) and clicking Delete Selected
- To Clone, select the copy icon ⎘ in the Action column.

Add Plan Information
After you click the Add Plan button:
- Complete required top level information:
- Select a Carrier: If you do not see a carrier we support, our service team will have to add a carrier license to your profile. Please contact our service team to open quoting for a carrier (855) 294-3258
- Carrier Plan Name: You must select a library template plan. Clear out any text pre-loaded into this field to see a dropdown of template library plans. These library plans are a mixture of actual carrier plans, as well as prior custom plans created by agents.
- Tip: Try to choose a template library plan that is the same or closely resembles the plan summary and rate detail information for your custom plan.
- Tip: Always double-check the information and rates are accurate. Update any outdated or incorrect information. These updates will be saved into your new custom plan within the library.
- Plan Code | Plan Name: will be filled in based on what you select in the Carrier Plan Name field. You must make the plan code and plan name fields unique every time you add a manual plan.
- Tip: Do not add the Employer name into either of these fields. We suggest you copy and paste the Employer/Account ID you see toward the top of the screen.
- Tip: Your Manual Plan will save into the library template plans (Carrier Plan Name field). It will be saved as the Plan Code + Plan Name fields combined together. This is how you can find and use your manual plans for future cases.
- Effective From: populates based on the Effective Date for the employer.
- Effective Till: calculates 2+ years from the effective from date. Although it looks locked, you will be able to edit this field after you save.
- Status: the default will be Active. If you want to update these to Inactive at a later time in the sales process, you can do it here.
- Plan Classification: you can tag this manual plan as a current, renewal or option plan for the group. What you select will determine how your manual plan is positioned on the quote export.
- Once this information is completed, proceed to the Plan Summary section below to further customize the coverage details.
Plan Summary

After you click the Add Plan button and enter the top-level plan information, you will see the Plan Summary section toward the bottom. Plan Summary has 3 steps: Plan Details, Attachments, and Summary. Click the Next or Previous buttons to cycle through each of the 3 steps.
- Plan Details: most of the information will pre-populate based on the selected Carrier Plan Name library template plan chosen above. Here you will find free form text fields where you can input or edit information such as: Deductibles, Out of Pockets, Rx, etc.
- Data you enter here will export onto the quote proposal. You can type in the information however you see fit.
- Nothing is required. It is suggested to complete as much as possible so your quote proposal looks uniform against other plans side-by-side.
- Never assume the information that pre-populates is 100% accurate. Please review all fields and update when necessary.
- Attachments: you can upload attachments for reference such as the Summary of Benefits and Coverage, or any type of informational document. Attachments can hold a maximum of 5 documents, and a 25MB size limit for each document.
- Attachments are not required.
- Summary: this is simply a review of the plan details and attachment grids. You can always click Previous to go back to these sections. When you are ready to proceed, click Save to go to the next step and add in the rates.
Plan Rates
After you complete all 3 steps of the Plan Summary and click Save, you will see the Plan Rates table where you can set the cost for your custom manual plan.

- Start off by selecting how the rates vary. Notice Rate Varies by Tier is required, so begin by checking this box. We have provided 2 of the most common rating methods below:
- 4-Tier or Composite Rating
- Select the following under Rate Varies by Tier and click Next:
- Employee Only
- Employee + Spouse
- Employee + Children OR Employee + Child
- Employee + Family.

- Click into the 0.00 cells to enter the monthly dollar amount rate for each tier. Click Next

- Click Add Rule. Select Calculation Method. For Rule Value select Use Employee Age. Click Save
- Click Finish
- Select the following under Rate Varies by Tier and click Next:
- Age Rated
- Select the following under Rate Varies by Tier and click Next:
- Flat Rate1
- Check the box next to Rate Varies by Age

- Set values for the First Tier, Middle Tier, and Last Tier. Then click Next:
- First Tier: from age 0 to first or youngest age group (most common is 14).
- Length of Middle Tiers: If price changes every time age increases select the default 1 (most common)
- Last Tier: the highest age for table rate (most common is 64)
- Click into the 0.00 cells to enter the monthly dollar amount rate for each age tier. If there are more than 10 age tiers, they will be separated onto pages. you can click the number or the right triangle arrow to cycle through. Once you have completed the table, click Next
- Click Add Rule. Select Calculation Method. Select the appropriate Rule Value:
- Use Spouse and Dependent Age (Most Common): if the carrier calculates the family rate by using the dependent and spouse age.
- Use Employee Age: Only the employee age is used to calculate the rates.
- Select Item:
- Top 3 Elder Children (Most Common): When families have more than children, only the 3 oldest ages are used for the calculation
- Enter up to what age (21 is the most common)
- Include All Child Dependent: calculate rates including all children.
- Top 3 Elder Children (Most Common): When families have more than children, only the 3 oldest ages are used for the calculation
- Click Add Rule and select Eligibility Rule. For Rule Value select Dependent Eligibility. Enter a Minimum Age and a Maximum Age (1 – 26 is the most common).

- Click Finish
- Select the following under Rate Varies by Tier and click Next:
- 4-Tier or Composite Rating
Congratulations! Your Manual Plan is complete after adding in the rates. You will now be able to click Save & Continue. You will be brought back to the Plan Information screen where you will now see a Manual Plans Listing section along with any manual plans you just created. You may now select the manual plan and use it similarly to any other plan on this screen.

Try selecting your new manual plan, and clicking Export Proposal to see how it looks!